You can append parameters to your survey link using URL query strings. Adding parameters to your survey link allows you to send out the same link, but customize it for each recipient, making it easy for you to connect the response to the participant later. URL query strings are also known as “URL parameters”, “URL variables”, “hidden fields” or “hidden values”.
As you can see in above example, parameters are simply added at the end of the survey link.
Why should I use parameters?
Using parameters in your survey link is a great way for you to know who the recipient is without having to ask for details in your survey. Here is an example use case: You have a survey that you would like to share with your customers. Normally you would send the same survey link to all customers and the only way you would know which customers responded would be to ask for their details as a question directly in the survey. With URL parameters, you can e.g. just append each customer’s number onto the survey link, completely removing the need for you to ask. Our system will then get that information for you, save it along with the response and include it in your result exports.
How do I add parameters?
You can add as many parameters to your survey link as you need. You simply take the regular survey link and then extend it by adding the parameters at the end. There are just a few rules you need to follow:
- Only alpha numeric characters should be used [ a-z, 0-9 ]
- Make sure there are no spaces in your link. The link and the additional parameters should make one continuous link
- If you need to separate words then use a hyphen
- The first character that comes directly after your link must be a question mark [ ? ], this will be the “start” of your parameters
- All “Keys” and “Values” must be separated with an equals sign [ = ], for example: name=john or id=1234
- The first parameter has the initial question mark before it. However, any parameters after that should then be separated with an ampersands [ & ] For example: ?name=john&id=1234&color=blue
Here you can see a survey link with multiple parameters. Each parameter consists of a “key” and “value” pair:
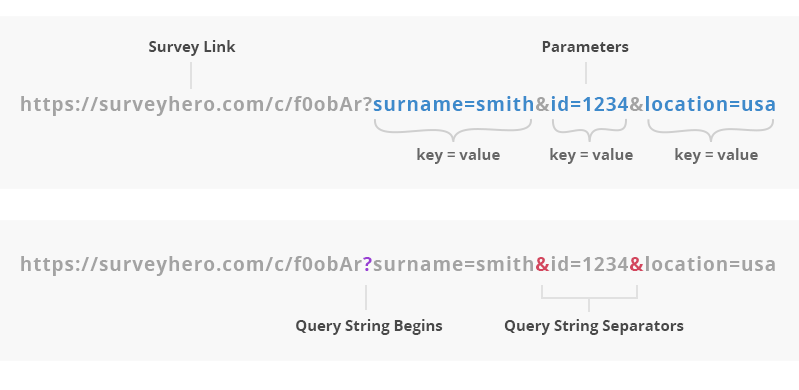
Before you add your own key/value pair to the link, you need to add a question mark [ ? ]. This declares the start of your parameters. After that you need to separate each new key/value pair with an ampersand [ & ].
What are “keys” and “values”?
Parameters are made up of values which have unique keys to identify them. The “key” is always on the left and the “value” is always on the right. The equals sign [ = ] assigns the value to the key. Please note that you should not use the same key more than once within the same link. Here are some examples of key/value pairs:
- key=value
- firstname=john
- lastname=smith
- customer-id=1234
What happens when people participate?
Nothing changes for your participants. They will be able to open their custom survey link just like a regular link. The questionnaire will open like always with no difference. The only difference happens behind the scene: Our system will save the URL parameters that you have added to the link along with the participants responses. This additional information will then be made available to you along with the respondent’s answers.
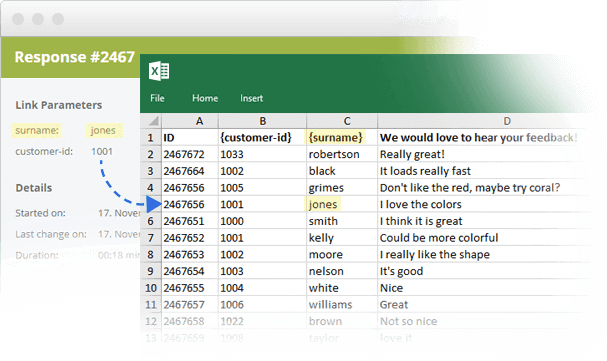
This means when you have a look at your results and bring up the responses, you will be able to also see the personalized parameter data that you added. We will also include the parameter data in your Excel/CSV exports, with a column for each “key” used.
What if I have many different recipients?
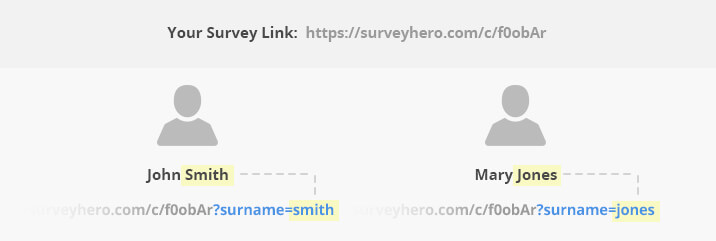
For everything to work properly when you are using parameters, you will need to make sure you have set the correct values for every single participant. The customer “John Smith” must get a link with his unique customer number in it and the customer “Mary Jones” must get her own link as well:
John’s Link: https://surveyhero.com/c/f0obAr?surname=smith&id=1001
Mary’s Link: https://surveyhero.com/c/f0obAr?surname=jones&id=1002
Consequently, you will also need to send one personalized email per recipient. This can be difficult when you have too many different recipients.
If you do not plan on sending bulk emails yourself, you can simply use our built-in Email Invite Collector. This automates all steps above. You can simply import your data from a spreadsheet (e.g. Excel), compose your email message and hit send. Our system will then automatically send one email per recipient, containing each individual survey link.
Can I use the data inside the questionnaire?
Yes, you can. This is explained here: How to use URL variables inside the questionnaire